Getting Started
A 5-minute guide to get up and running with G2Wallet External API — from obtaining your API key to making your first request and reading the response.
1. Get your API Credentials
Sign in to the G2Wallet Merchant dashboard to manage API keys, optional HMAC request signing, webhook callback URLs, and the IP whitelist. The sk_test_ and sk_live_ key prefixes select the transaction environment. The API Base URL and IP allowlist are shared merchant settings. Configure test callback URLs at /sandbox/api-settings and live callback URLs at /developers/webhooks.
Use the Merchant dashboard URL issued to your account by the G2Wallet team
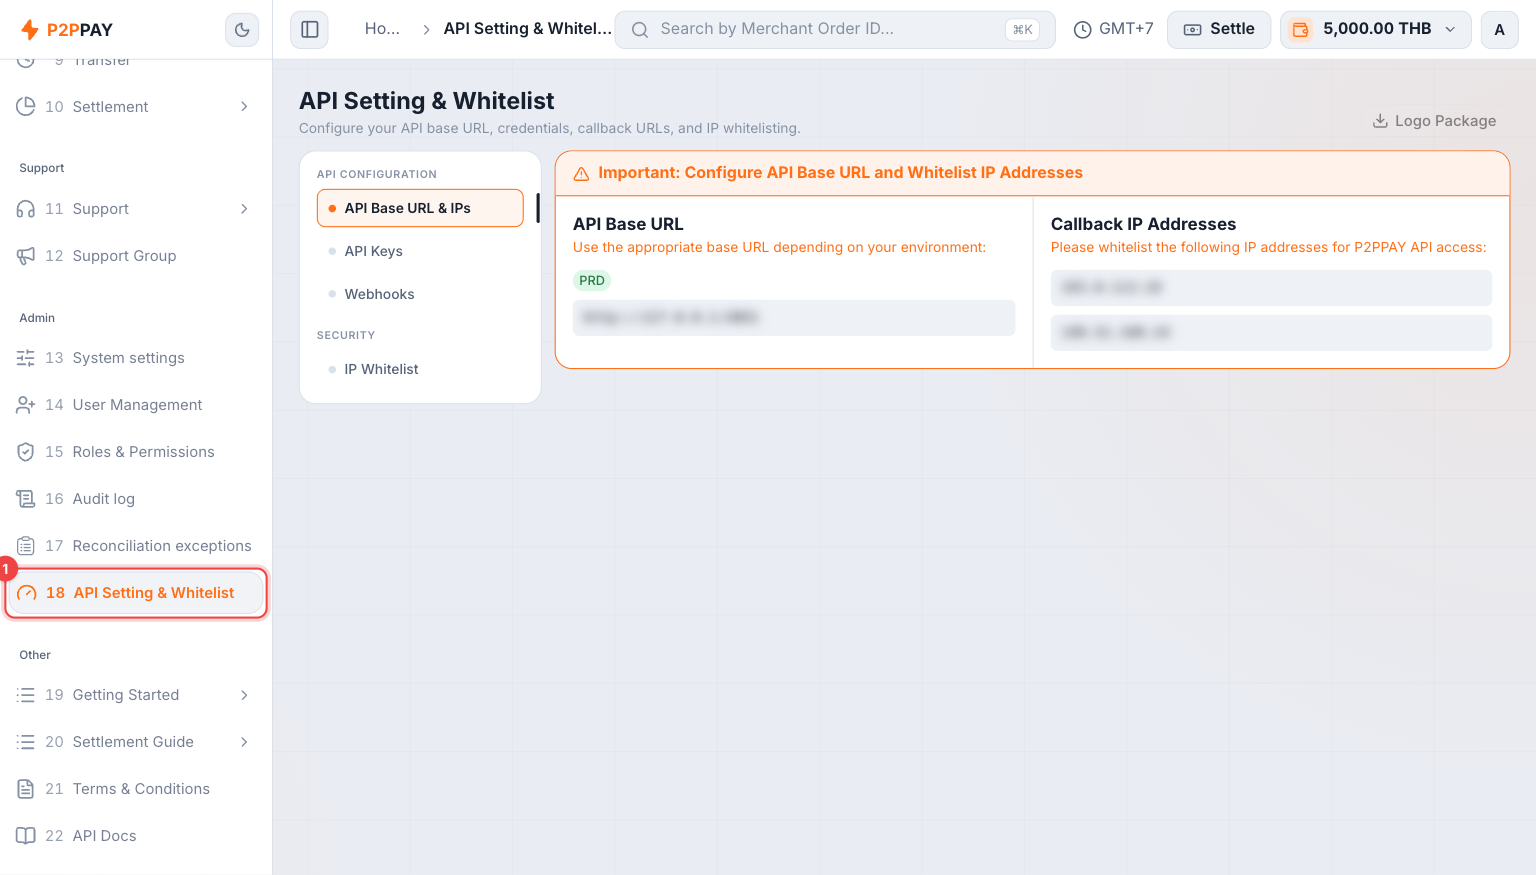
Open the left menu → API Setting & Whitelist. It has four sections: API Base URL & IPs, API Keys, Webhooks, and IP Whitelist.
1.1 API Credentials
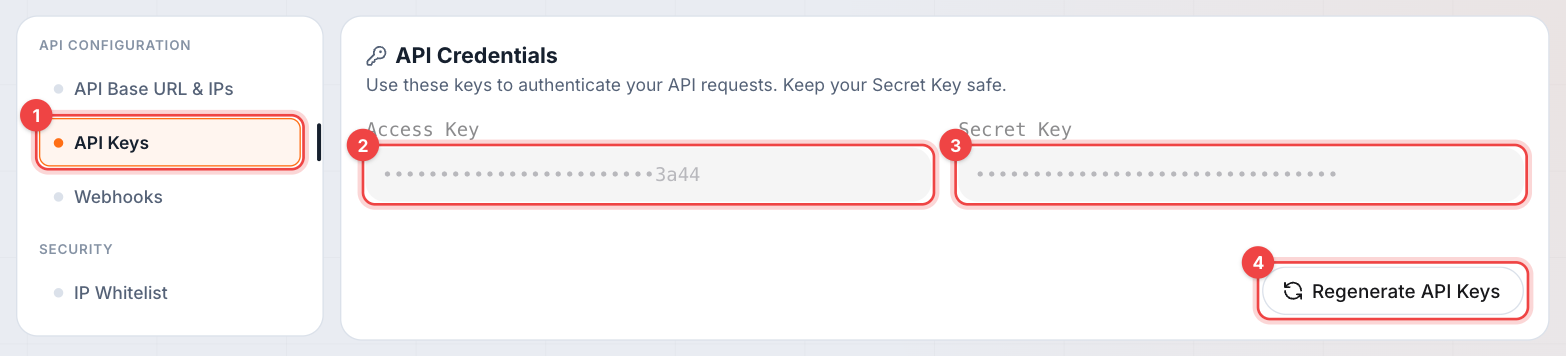
In the "API Keys" section, copy the raw sk_test_... or sk_live_... key and send it as Authorization: Bearer. If a key is exposed, regenerate it in that environment to revoke the old key. Newly generated test and live keys both start with HMAC signing disabled.
1.2 Webhook Callback URLs
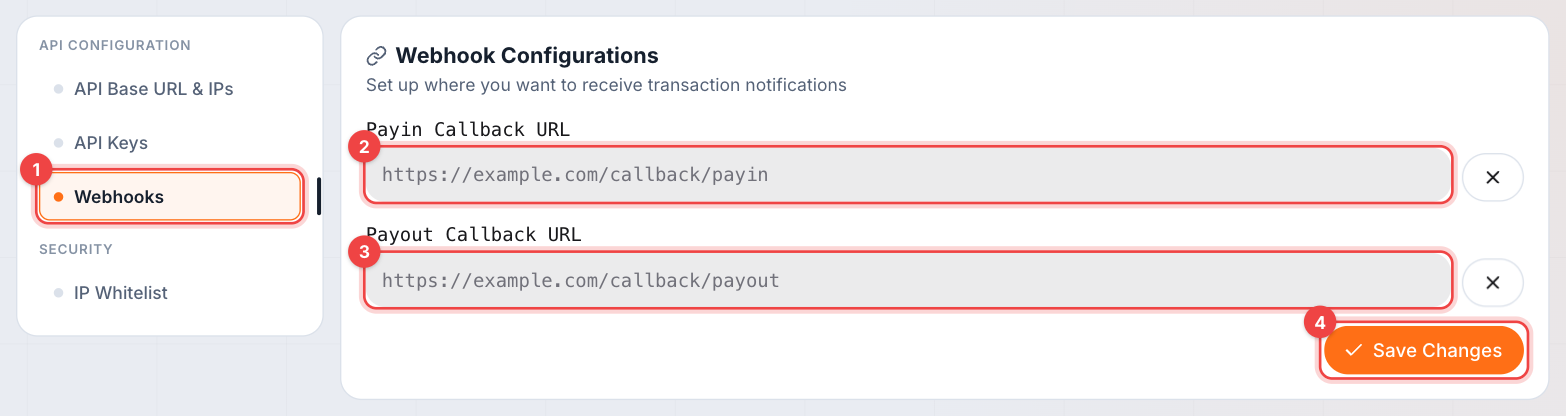
In the "Webhooks" section (①), set the Payin Callback URL (②) and Payout Callback URL (③), then click Save Changes (④). G2Wallet sends a POST with an {id,event,livemode,created_at,data} body envelope plus X-P2P-Timestamp and X-P2P-Signature. Acknowledge with any HTTP 2xx; a 4xx is a permanent rejection, while a 5xx or timeout is retried. De-duplicate automatic retries by the body id, which remains the same; a manual payin.succeeded resend creates a new id. The callback URL cannot be set per transaction, and both fields may point to the same URL; branch on the body event.
Payin Callback URLPayout Callback URL
1.3 Whitelist IP (optional, recommended)
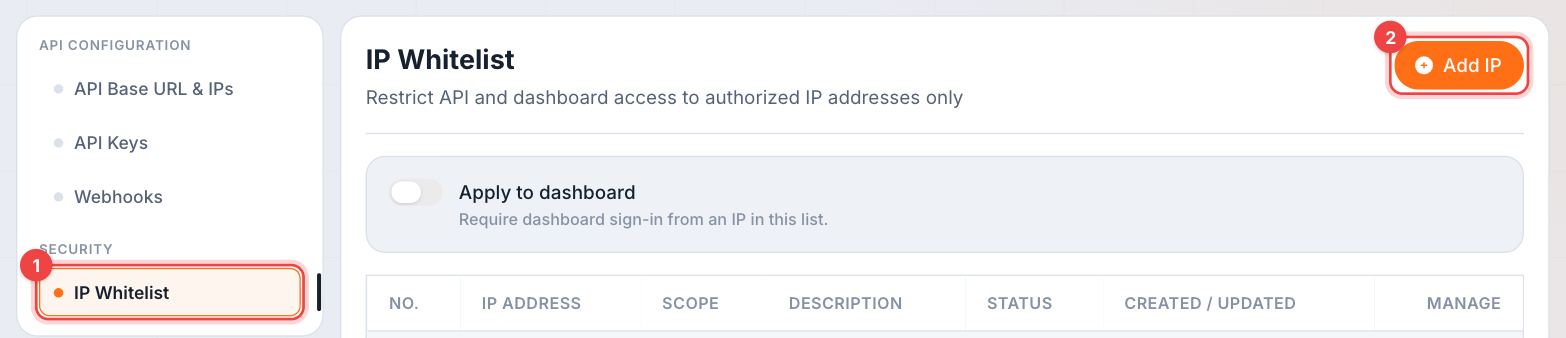
Open the "IP Whitelist" section (①) and click Add IP (②) for every egress IP of your production service. Requests from other sources are rejected regardless of valid keys.
1.4 API Base URL & IPs
Copy the API Base URL shown in "API Base URL & IPs" for both sk_test_ and sk_live_ requests to /v1. The displayed webhook source IPs are deployment settings; when present, allowlist them for callback traffic on your firewall.
2. Headers for /v1 requests
Every /v1 request requires Authorization: Bearer, and POST requests require Idempotency-Key. When HMAC is enabled for a test or live key, every request with that key also requires X-Signature-Timestamp and X-Signature. Newly generated keys start unsigned.
| Header | Description |
|---|---|
Authorization | The raw Bearer API key, such as Bearer sk_test_... or Bearer sk_live_...; required on every /v1 request |
Idempotency-Key | Required for mutating POST requests; reuse the same value when retrying the same operation |
X-Signature-Timestamp | Optional by default; required when the authenticated test or live key has HMAC signing enabled. Use Unix seconds within ±300 seconds of server time |
X-Signature | Optional by default; required with the timestamp when the authenticated test or live key has HMAC signing enabled. It is the lowercase HMAC-SHA256 of the exact five-field raw request |
3. Make your first request — check balance
Call GET /v1/balance to check the balance in the key’s environment. This example assumes the sk_test_ key has HMAC disabled, so it sends only Authorization: Bearer; GET does not require Idempotency-Key.
# 1. Copy the API Base URL from your merchant dashboard
export P2PPAY_API_KEY="sk_test_..."
export P2PPAY_BASE_URL="https://api.example.com"

# 2. Call the API (Authorization: Bearer sk_test_...)
curl -s "${P2PPAY_BASE_URL}/v1/balance" \
  -H "Authorization: Bearer ${P2PPAY_API_KEY}"
4. Example response
5. Fund a test payout
Use an sk_test_ key with the sandbox:topup scope to call POST /v1/sandbox/top-up, which funds only the test balance. Regenerate test keys issued before this scope was added. Send amount_minor as an integer in the currency’s minor units; 10000 means THB 100. The amount must be positive, at most 10000000 per request, and divisible by the currency’s unit_step. Include Idempotency-Key and reuse it when retrying the same request. This example assumes the test key has HMAC disabled; when enabled, also send X-Signature-Timestamp and X-Signature as described in Authentication.
curl -sS -X POST "${P2PPAY_BASE_URL}/v1/sandbox/top-up" \
  -H "Authorization: Bearer ${P2PPAY_API_KEY}" \
  -H "Idempotency-Key: sandbox-topup-001" \
  -H "Content-Type: application/json" \
  -d '{"currency":"THB","amount_minor":10000}'